OPULUXELtd.com LIFESTYLE===}}{{=== DESIGN
___oOo___EVENT Planning___oOo___LUXURY eStore___oOo___TRAVEL Agency___oOo___Archive for Do it yourself
Cheap & Chic DIY ecoLuxe Headboards via [lovely undergrad, copycat chic, curbly,and allthingsgd]

![]()


OPULUXE Lounge Grooves™ PlayList
One of the easiest ways to spruce up a boring bedroom is by dressing up the bed. But pillows, bedsheets, and a pretty comforter only go so far. Here are some diy headboard ideas so that you can give your bed a little extra ooomph!
 Above: For this “Tall Order” headboard featured at BHG (Better Homes & Gardens), an inexpensive artist’s canvas was covered in fabric and propped behind the bed. I particularly like this project because the canvas could be re-covered if you want to change you color scheme or it could moved around the room if you no longer wish to use it as a headboard. I do think, however, that it should be fastened to the wall in some way to avoid falling on your head during sleep. Some kind of adhesive hooks might just do the trick?
 Above: If you’re feeling especially ambitious or crafty, a diy-upholstered headboard may be just the project for you. Click here for BHG instructions on creating this luxe headboard using medium-density fiberboard, batting, and your choice of fabric. (Apparently it takes only three hours and no special tools are required!)
 Above: This “Letter Perfect” headboard shown on BHG is dedicated to all you bookworms and future novelists out there. Collect new or vintage letters of varying sizes and colors flea markets, antique shops, and craft-stores… and put ’em up on the wall with some double-sided tape, poster putty, or adhesive hooks (depending on the material and weight of your letter).
 Above: Hey, globetrotters… you may like BHG’s “Map Quest” headboard project. Simply use decoupage medium to adhere paper road maps to an old headboard. (Note: Do not, under any circumstances, decoupage the dorm-provided headboard… it will damage the school’s furniture.) For a dorm-safe approach I would recommend either doing this to a headboard you own and bringing it to school… or decoupaging a flat piece of plywood and temporarily attaching it to the headboard the school provided you with.
 Above: Add some timeless romance to your dorm by borrowing the “Screen Star” idea from BHG. Simply place a folding screen between your headboard and the wall. Wrought iron is always gorgeous, but there are a variety of screen available out there. Plus, a vertical screen will draw the eye upward.
 Above: BHG’s “Perfectly Padded” idea is a new take on the old upholstered headboard. I absolutely adore this idea. Simply hang a bench cushion by it’s ties from wall-mounted hooks. I think those adhesive hooks are pretty much ideal for this project. (Just make sure that they are all attached to the wall at the same level so that your cushion isn’t crooked.) You could also put a twist on this diy by hanging the cushion over the long part of your bed instead of at the headboard. It could give your bed a daybed like.
 Above: Isn’t this BHG project pretty? This “Elegant Illusion” also happens to be a piece of cake. While you’re not allowed to paint the walls at school, vinyl decals are a great alternative. I’m sure if you shop around you’ll be able to find a vinyl headboard decal. Or you could stick other decals to the wall and create your own idea of a headboard. I think one of those chandelier silhouette decals would be quite eye-catching over a bed.
 Above: So this BHG idea, called “Pop of Color“, is the easiest, most convenient, and easiest headboard project. So if you’re not crafty, on a small budget, or simply change your mind a lot… give this diy a chance. Simply drape a panel of fabric over the headboard. Then tuck the ends under the mattress to keep it in place. Yup… it’s that easy. With several pieces of pretty, patterned fabric on hand, you could change your headboard’s look on a whim.
 Above: This “Paper Headboard” from I heart Norwegian Wood on Flickr is super easy and super stylish. The headboard design was simply drawn onto and cut out of thick, white poster board and stuck to the wall.
 Above: This “Scrapbook Paper” headboard (also from I heart Norwegian Wood) is what I’m leaning towards doing in my own dorm room. I was first inspired by a $13 Paper Wall, but it took some surfing around to find a photo of what I wanted to do… which is to attach scrapbook paper in different colors and patterns to the wall above my bed. I think I may go all the way up to the ceiling though in my room. This can be done by simply attaching scrapbook paper squares to the wall with double-sided tape, adhesive strips, or poster putty.
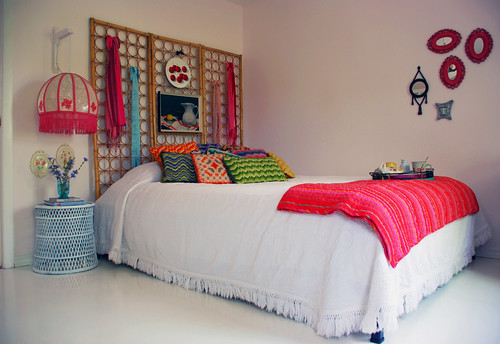 Above: I love the headboard in this bedroom belonging to Flickr user kimhas6cats. It’s a different take on using a screen as a headboard. It’s her screen that’s really the key. It seems that it was just made for hanging things… like scarves, artwork, etc. It’s really quite a fabulous idea. And considering I personally own over twenty scarves… I’m keeping my eyes open for a screen like this. Imagine all the other things you could hang from it! So many possibilities.
Final Word:
If you’re creative, crafty, and innovative… there is a variety of ways to customize your bed and your dorm in general. But I do stress over and over again that it’s soooo important to read your residence hall contract and handbook so that you know what you are allowed to do decor-wise in the dorm and what is prohibited. Every college has different rules. If you don’t understand something in the contract or handbook, e-mail your residence hall director or dormitory staff. Be informed, be safe, and be creative. 🙂
I’m going to call attention to a couple of my favorite blogger DIY projects. These ladies both made their own gorgeous headboards inspired by designer beds for a substantial savings! What’s not to love? I’m seriously considering making myself a new headboard, even though the one I have is less than a year old….lol.
First up, we have Freckles Chic with her awesome linen headboard with nailhead trim. Cost of making this headboard? Only $73!
Looks pretty similar to West Elm’s Nailhead Upholstered Headboard…King size = $449.
Next, Holly over at Life in the Fun Lane made a glamorous white headboard (directions here)in keeping with her unique clean cottage chic style. Just love it!
This is an easy and cheap way to get a headboard that looks like Williams Sonoma Home’s Fairfax Bed with out the pocket emptying cost!


Yeah yeah, we’ve all seen enough headboards, right? Well, imagine this long upholstered headboard with a queen sized bed in front of it and two sparse, but interesting side tables on either side of it. It would function as a headboad, of course, but also as wall art across a wide expanse of wall. That’s been on my drawing board for a long time, and now someone has gone and done it. As usual Cococozy has compiled a nice little assortment of fantastic photos of yet more headboard alternatives for your consideration.


Above: Decal Wall Stickers Headboard (those with patience could paint this)
Block of Blue Headboard

Photo by Eric Roth
Wingback Headboard

Photo: Richard Powers
Floral Screen Headboard

Photo: Polly Wreford
I received a reader request from my fabulous friend Beth who’d like to see some DIY headboard options for her darling daughter Maya. Well ladies, here’s what I was able track down–hope you see something you like!
The first thing that came to mind is a DIY headboard made from a piece of picket fence. My mother-in-law did this in her guest room and I just love it. Nice and simple, and oh so cute. Unfortunately I don’t have any photos from my mother-in-law’s house, but here is one from Better Homes & Gardens. I also found a slight variation at HGTV.com.

Another great idea is this simple DIY canopy, which would be so cute for a little girl’s room–and you could change out the fabric as she grows and her tastes mature!

The fun fabric and shape of this charming DIY upholstered headboard keeps it looking young and playful.

Another simple great idea–again from Better Homes & Gardens. This headboard is made from plain old bi-fold closet doors painted with stripes.

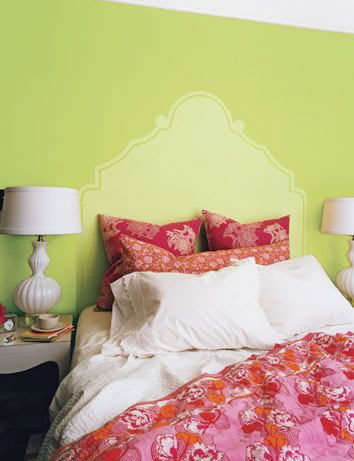
I love this chic suggestion from Domino–painting a faux headboard right on your wall using a color just a couple shades lighter than your wall color. Don’t want to buy a whole other can of paint? Just mix some white paint with your existing wall color paint and you’re good to go.
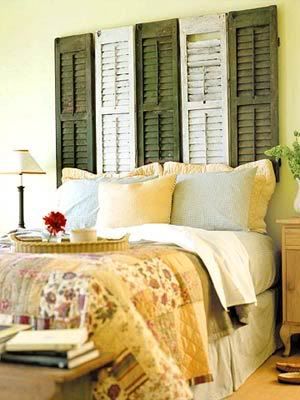
Although not necessarily what comes to mind for my friend’s daughter Maya, here are two more ideas from BHG that I just love–Pic 1 is made from a painted paneled door, and Pic 2 is made with weathered shutters.
 |
 |
As you may have noticed by now–Better Homes & Gardens is an excellent site for finding some beautiful DIY headboard ideas! To see these DIY headboard ideas and more, check out their slide show of 29 Cheap & Chic Headboard Projects.
And if anyone has any other great ideas for Beth’s daughter, we’d love to hear them!


DIY – “T-Shirt Flower Wedding Bouquet” via [bridescafe]
Hi Guys….I’m so excited to share the cutest DIY project with you today….”T-Shirt Flower Wedding Bouquet”. It is just to sweet….a totally “new twist” on wedding bouquets….our DIY is brought to us today by the oh-so-talented and sweet, Maize Hutton…..Maize is an AMAZING crafter and designer….I’m so happy that she stopped by to share one of her many meaningful and beautiful DIY projects with us…Enjoy!
Ingredients:
T-shirts
Scissors (regular and decorative scallop)
Needle & Coordinating Thread
Branches or Bark covered wire
Kraft Paper or brown paper sack)
Twine, lace or ribbon
Glue gun & glue
![]()

| Directions:
For Each Flower:
|

| 2. Cut each strip along edge approximately 1/4″-1/2” leaving 1/2” at the other edge. |

| 3. Gather all 3 strips together matching uncut edge. |

| 4. With needle and thread, secure the three strips with a stitch.
|

| 5. Start sewing layers together securing with a stitch while rolling into a flower. |

| 6. Continue sewing layers together securing with a stitch until you’ve reached the end of the strip.
|

| 7. When complete, inside flower will have a ‘well’ for branch or wire to insert.
|

| 8. Insert 1-2 drops of hot glue in flower well. Stick in branch or bark covered wire for stem.
|

| 9. Stitch around to secure flower to stem.
|

| 10. Cut kraft paper using a decorative edge scissor or scallop scissor. Wrap paper around flower bouquet. Tie with twine, lace or ribbon to match your wedding colors. |

Now you have a beautiful DIY wedding bouquet for the bride or bridesmaids! You can also use these flowers as corsages by simply attaching a pin to the back instead of a stem. You may also cut leaves and attach to the flowers as I’ve done in the finished bouquet.
Another technique is to cut the material 4 inches wide and fold in half, sewing the cut edge together with your sewing machine. Then use your scissors to cut down the folded half and then cut the ¼” strips. Follow the instructions by rolling the flower as described above. This produces a thicker flower.
Have fun crafting and enjoy!
Maize….thanks SO much for sharing your work with us today…we look forward to your next visit…and guys, please head over to Maize’s blog site to see more of beautiful work!
Cool NEW Gadget: Zoku Quick Pop Maker via [coolhunting and thekitchn]
![]()

Zoku Quick Pop Maker
A nifty gadget that makes homemade popsicles in minutes
by Wendy Dembo


With gourmet popsicle brands all over Manhattan touting newfangled flavor combos (see Popbar, People’s Pops and La Newyorkina), the Zoku Quick Pop Maker steps in with a DIY way to concoct your own—three at a time—in less than 10 minutes.
Fun to use and loved by kids, you can keep it simple or (with patience) you can make pretty pops by pouring in one liquid, letting it sit for a few minutes and then adding another layer or two of a different juice. Tipping the machine leads to wavy lines, and experiments with fruits and yogurts, or even more adventurous fixings like carrots and beets, present limitless options for creativity.


The only downfall is that you have to freeze the Zoku for 24 hours before you can start to make your own personally-designed chilly pops. Pick it up from Zoku or Williams Sonoma for $50.
Remember the agony of waiting for popsicles to freeze when we were kids? Using technology similar to an ice cream machine, the folks behind the Zoku Quick Pop Maker have all but eliminated that wait time. Instant gratification is ours!


How It Works
The Zoku consists of a sturdy hard-plastic base filled with the same kind of liquid found in ice cream makers. There are three individual wells for popsicles set into the base. These are made of non-stick cast aluminum so the pops are easy to remove once frozen. The popsicle sticks are made from plastic and specially grooved to grip the popsicles. (Six popsicle sticks are included.)
You first have to freeze the base overnight. Once it’s frozen solid, you insert the one popsicle stick into each well, pour in your popsicle base of choice, and wait for it to freeze. A special device called the Super Tool screws into the popsicle stick and helps to lift the frozen popsicles from the mold, which are otherwise difficult to remove by simple pulling. Snap on a drip guard and the popsicles are ready to eat.
Testing It Out
Check out the slide show above for a visual walk-through of the product.
Just as the instructions said to do, we froze the base overnight and took it out when we were ready to make our pops. Shaking it, the base felt completely solid and we heard no sloshing of the liquid inside.
We made a variety of popsicles to really put the Zoku through its paces. In the first round, we did a basic lemonade pop, one with slices of strawberries, and one with some of our leftover cranberry jelly. In the second round, we tried making yogurt pops layered with pomegranate juice following the recipe we talked about yesterday.
All of the lemonade pops froze solid in about 9 minutes. The yogurt pops took a little longer, about 12 minutes for the swirled pops and 20 minutes total for the layered pops. We were able to do two batches of the lemonade pops before the base needed re-freezing. With the yogurt pops, we only got one batch.
Both the lemonade and the yogurt pops were easy to remove from the mold using the Zoku Super Tool and made perfectly formed popsicles.
The instructions recommend not washing the device between each use, but it was pretty darn sticky after our few batches! We couldn’t help splattering the top while pouring and the outside also filmed over with frozen condensation. The insides of the wells stayed pretty clean, though. Since the Zoku instructions are also adamant about making sure the Zoku is completely dry before putting it back in the freezer, we used a plastic spatula to scrape off the splatters and condensation, and then used paper towels to make sure everything was dry before re-freezing it.
The Pros
This device really was as simple and straight-forward to use as promised. There are no cords to plug in, and no fancy parts to figure out. Using the Zoku is almost completely self-explanatory. Kids can definitely use it, though we’d recommend having an adult around for children under the age of 8 or so.
It made lovely popsicles and seems to work well with a lot of different base ingredients. Since the results are so instantaneous, it was really fun to play around with adding fruit, making layers, and combining flavors.
The texture of the pops was really amazing. Since it freezes so quickly, the ice crystals stay very small. This makes for a smoother, more evenly-textured popsicle. Biting off a piece was almost like eating a spoonful of ice cream or sorbet.
The Cons
The Zoku was also trickier to use in some ways than we expected. Anything that touches the sides of the mold freezes instantly. So if you’re making a layered pop or adding fruit, it can be challenging not to drip on the sides and to position fruits where you want them. Our pops definitely did not look as perfect as the pictures!
The instructions also say to insert the popsicle sticks before pouring in any of the ingredients, but we found that the sticks were really in the way and made things messier. It was far easier to fill the mold nearly full and then insert the sticks. The middle doesn’t freeze for several minutes, so as long as you leave a little headroom to allow for the stick, this was fine.
The promise that pops will freeze in 7-9 minutes and that the base can be used for three batches before re-freezing is a bit misleading. This might be true if you are making three batches of all-juice pops in very quick succession. But if you’re doing anything more complicated (like layers or making pudding pops), if you don’t take the pops out as soon as they’re ready, or if you wait a little too long between batches, a second batch starts to become iffy.
Subsequent batches also take much longer to make. This is expected as the base thaws in your warm summer kitchen, but can be frustrating if you have a line of neighborhood children wanting to know why they have to wait so long!
Overall Impressions
This is a good product with a solid design and lots of fun applications. We think it’s ideal for small family gatherings or an afternoon play-date with a friend or two.
Since you can only make three popsicles at once and since they have to be eaten right away (meaning you can’t make pops in advance or save ones that aren’t eaten), we think this is less ideal for larger parties and gatherings.
Do you have a Zoku? How have you liked it?
Check It Out!
Zoku Quick Pop Maker from Zoku
Zoku Quick Pop Maker, $49.95 from Williams-Sonoma
Apartment Therapy Media makes every effort to test and review products fairly and transparently. The views expressed in this review are the personal views of the reviewer and this particular product review was not sponsored or paid for in any way by the manufacturer or an agent working on their behalf. However, the manufacturer did give us the product for testing and review purposes.
(Images: Williams-Sonoma and Emma Christensen)
The Outside-of-the box and “Assembly Required” Ikea Dinner Parties:A NEW Hipster Trend via [cockeyed and Mental-Floss]
OPULUXE Lounge Grooves™ PlayList
Despite early stumbles in America, twenty years later, the store has
so ingrained itself into our society that a trend amongst urban hipsters
is to host dinner parties at the stores. A meal of lingonberry jam and
meatballs at the cafeteria for the host and guests, and the living room
displays make perfect venues for a round of Taboo and Pictionary. A blog
posting chronicling the first party in Sacramento led to a string of
copycats across the country. So far, IKEA management doesn’t seem to be
complaining.— Mac Carey [author of the article: 5 Things You Didn’t
Know about Ikea, but (Should) via Mental_Floss]
via [Revver]
The IKEA Fancy Dress Dinner Party

Oh! Those IKEA room displays! Entire rooms full of furniture,
lighting, rugs and notions. Any one of those rooms would be a great
place to sit and entertain friends. They look so comfortable and
inviting!
It was an invitation that Jason Adair couldn’t pass up. He decided to
have a Fancy Dress Party at IKEA.

Before the pary, he invited me along to a
mission-planning/brainstorming session. We scoped out which rooms would
work best for a large gathering, checked the location of employee
kiosks and established the availability of electrical outlets.

The West Sacramento IKEA is a huge store with tons of merchandise,
but shoplifting is apparently not a concern, because the upper level is
left pretty much unsupervised. The possiblilities were amazing! We
were both fairly confident that a group, particularly a well-dressed
group would not be kicked out… but you never know.
As insurance against getting thrown out, Jason made up
official-looking invitations.

The party was scheduled to start at 7:00 pm on Saturday, on the
second floor of the West Sacramento IKEA. It would start at the
cafeteria. After dinner, guests would retire to one or more of the
living rooms for games.
The attire was semi-formal, and guests were encouraged to bring board
games.
On the evening of the party, I arrived a little early and picked up
some wine goblets and a corkscrew on the first level sales floor. I
ran upstairs and found an open table. Within minutes, guests began
arriving. Right away there were 10-15 of us, ready to eat.


opted for the meatballs and potato for $5.99. We must have looked as
if we were a wedding party, in the buffet line.
Guests continued to arrive during dinner, and by 8 p.m., there were
about 28 people.
Dinner was over, and we streamed out of the cafeteria and headed to
the showrooms.

Showcase Showdown
Jason was at the lead and paused briefly to get his bearings. When he
stopped, a very helpful employee noticed he was lost and asked him
what he was looking for.
This conversation with an employee didn’t look promising, but it
didn’t stop anyone other than Jason.
Most of us just walked past them and found rooms to occupy. Five of
us sat at a large glass table in a kitchen/dining room showcase. I
dustributed wine glasses and we busted out letter tiles for a rousing
game of BananaGrams. Other guests were in a model living room playing
Scott’s Boggle! game, and some others were gathered in a third room,
lounging around a television set.

Jason downplayed our real intent, but let the very nice man know that
we were here to play board games, and that we had chosen IKEA for the
location because it was so much nicer that any of our own
actual homes.
To his credit, he could not have been friendlier or more relaxed
about the situation. This guy was pretty much the opposite of all the
shopkeepers/management that Improv
Everywhere encounters.

We sat and talked for a few rounds.

IKEA shoppers drifted into the kitchen, but no one asked any
questions. They seemed a little perplexed by our presence, but not
enough to ask us what the hell we were up to.
At one point, two casually-dressed friends of Jason needed to leave,
and they asked him for directions out of his “house”.
“Oh, just turn left at my second living room, down the long hall, til
you hit my third kitchen. Go through the second master bedroom and
downstairs to the warehouse.” was the reply.
As with any good dinner party, the time flew by. Bananagrams was
interrupted by an announcement – IKEA was closing in 30 minutes!
It was, by now, obvious that we would never be kicked out.
The party was really rolling at this point, so I recruited as many
people as I could for a boisterous game of electronic Catch Phrase.

We split into two teams for a 12-person contest of electronic beeping
and feverish clue shouting.
Nine O’clock arrived and the intercom announced that IKEA was now
closed.

We proceeded with a disorganized exit.
Gathering outside, we were pleased to discover a well-stocked garden
area, inviting us to stay a while.
Many of us stayed, joining Jason’s impromptu patio quiz show.

What a terrific time! I highly recommend having your next formal
event at IKEA. Before you get started, you should be aware of some
shortcomings with this location:
- IKEA doesn’t serve the kind of beer that I like.
- Hors d’ouvres were impossible to track down.
- We had to assemble the whole thing by ourselves
- Not enough GULLHOLMEN in the VORDAGSRUM

The Local River: An Awesome Sustainable Food Design Project. via [Dezeen] Date
![]()
OPULUXE Lounge Grooves™ PlayList
Local River by Mathieu Lehanneur

French designer Mathieu Lehanneur has created Local River, a concept for a domestic “refrigerator-aquarium” that breeds freshwater fish for eating and grows vegetables at the same time.

Inspired by the Locavores movement of people who source food grown locally to avoid pollution and ensure freshness, the project would allow people to produce their own food at home.

Vegetables growing in floating pots would help purify the water by removing nitrates and other minerals.

The concept will be presented at Artists Space Gallery in New York from 25 April.
Here’s some info from Lehanneur:
–
LOCAL RIVER
Mathieu Lehanneur
With
Anthony van den Bossche, spin doctor.
Local River, home storage unit for fish and greens
The Locavores appeared in San Francisco in 2005 and define themselves as ‘a group of culinary adventurers who eat foods produced in a radius of 100 miles (160 km) around their city’. By doing so they aim to reduce impact on the environment inherent to the transport of foodstuffs, while ensuring their traceability.
Local River anticipates the growing influence of this group (the word ‘locavore’ made its first appearance in an American dictionary in 2007) by proposing a home storage unit for live freshwater fish combined with a mini vegetable patch. This DIY fish-farm-cum-kitchen-garden is based on the principle of aquaponics coupled with the exchange and interdependence of two living organisms – plants and fish.
The plants extract nutrients from the nitrate-rich dejecta of the fish. In doing so they act as a natural filter that purifies the water and maintains a vital balance for the eco-system in which the fish live. The same technique is used on large-scale pioneer aquaponics/fish-farms, which raise tilapia (a food fish from the Far East) and lettuce planted in trays floating on the surface of ponds.
Local River responds to everyday needs for fresh food that is 100% traceable. It bets on a return to favour of farm-raised freshwater fish (trout, eel, perch, carp, etc…), given the dwindling supplies of many saltwater species due to over-fishing. It also demonstrates the capacity of fish-farmers to deliver their stock live to a private consumer as a guarantee of optimum freshness – impossible in the case of saltwater fish that has been netted.
Local River aims to replace the decorative ‘TV aquarium’ by an equally decorative but also functional ‘refrigerator-aquarium’. In this scenario, fish and greens cohabit for a short time in a home storage unit before being eaten by their keepers, the end-players in an exchange cycle within a controlled ecosystem.
Materials: glass: blown & thermoformed, water pump, joints.
Dimensions : Large : 64 x 29 x 39 inches, Small : 29 x 18 x 36 inches.
Mathieu Lehanneur, designer. Graduated from ENSCI-Les Ateliers in 2001; is currently exploring possibilities in nature and technology for their break-thru potential in functions and their capacity to work magic. Made his international début with a series entitled ‘Elements’ (VIA Carte blanche 2006) and the ‘Bel Air’ filtering system for plants (2007), six objects that form a domestic ‘Health Angels’ kit for rebalancing everyday physiological needs (such as lack of sunlight in winter) and countering aggression factors in urban settings (noise & air pollution).
http://www.mathieulehanneur.com
Anthony van den Bossche, age 36, independent ideas man and curator. Set up Duende Studio in 2007, for events design and press relations. Moved full-time into design in 2001 after working as a journalist, ideas man and producer in television. Has mounted exhibitions such as “Design@home.se’, ‘Norway says’ and ‘Eden ADN, genetic design’ (Biennale de Saint-Etienne 2006) that highlight functional and decorative improvement of living organisms. Member of the purchasing jury of the National Fund for Contemporary Art, decorative arts department, and creator of the world gazette website http://www.resetdesign.com (2002-07).
http://www.duendestudio.fr
Alexandra Midal, professor of theory & history of design at Ecal (Switzerland) and School of Fine Arts of Toulouse (FR), former directress of Frac Haute-Normandie, now an independent curator of exhibitions. Has published several books and catalogues, including ‘Appartement témoin, les annees 50′, ‘Appartement témoin les annees 60′, ‘Antidesign : petite histoire de la capsule d’habitation en images’, and in 2008 ‘Tomorrow Now-When Design Meets Science Fiction’.
–posted by Marcus Fairs.


